One of the most effective ways to use Morpheus to improve your health, fitness, and performance, is to get in your zone and dial in the intensity of each workout.
Training with Morpheus starts using with the M7 chest strap to get accurate heart rates for any and all types of training. Unlike optical sensors that are not suited or accurate to use for high-intensity and/or high-speed exercises, the M7 can be used for virtually any type of workout you may throw at it.
There are currently 3 different options for recording workouts into Morpheus.
-
With the Morpheus app in real time (Live mode)
- This can be done with the M7 or with any Bluetooth HRM This is the best option when you can look at your phone while you’re training. This will show you your HR, HR Zone, time in each zone and other data. This also allows you to use the ZBIT feature.
-
With the M7 but WITHOUT the Morpheus app (Offline mode)
- No phone required. The M7 can save your workout and upload to the Morpheus app after you’re done (aka SYNC). With this option you can use the M7 by itself or you can pair it to any ANT+ or BLE watch or device – makes it easy to see your heart rate during your workout without a phone.
-
Import Workouts Directly from Garmin Connect
- You use your Garmin watch or other Garmin device to record workouts and Morpheus can import that workout data directly from your Garmin Connect account. This will help in situations where using the Morpheus app in real time or using the Morpheus M7 are not practical or not preferred.
Any workout you want to be in Morpheus needs to be recorded via one of the 3 methods above. We do not currently import workouts from other platforms.
In the section below, you’ll learn how to use each of these 3 scenarios.
Make sure to take a minute to read through through the entire section so you will know exactly how to get the most out of each and every workout.
Using the Morpheus app for real time training (Live mode)
Connecting the M7 to the Morpheus app gives you the ability to see exactly which Morpheus heart rate zone you're in at all times.
This is particularly valuable when you're doing a workout that incorporates any of the Morpheus zone-based training methods.
Starting a Workout
- Tap the blue TRAIN icon at the bottom of the home screen
- Select your Workout Type - Cardio, Mixed, or Strength
- If you only be doing cardiovascular work, select cardio.
- If you are doing a workout that consists of both cardio and strength work intermixed throughout the full workout, select mixed.
- If you will only be doing strength training, then select strength.
- Note that heart rate zones are not displayed during strength-only workouts. You will only see gray color for strength in the app. For more information on why this is, please review the Morpheus Heart Rate Zones article.
- If you are doing separate cardio and strength training (such as strength training first half of the workout and cardio second half of the workout), it's best to track these separately)

- Next, tap CONNECT HRM to pair the M7 (or any compatible Bluetooth HRM) to the Morpheus app.
Important: You will need to turn the M7 on before you can connect it to the Morpheus app. To do this, you must be wearing it appropriately. For important info and tips regarding wearing and using the M7 heart rate monitor, please visit the link below.
- The M7 will show up with its unique 5-digit ID in the available devices list.
- Tap OK to connect to it to the M7 and your heart rate will be displayed on the screen.
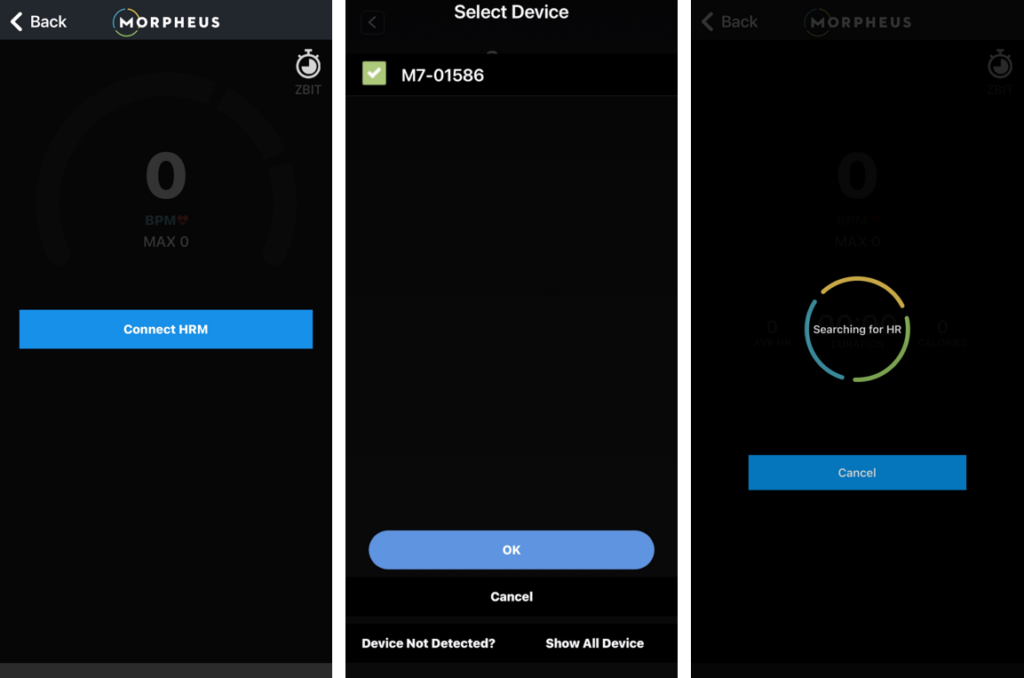
- You will see the battery life of the M7 (or other heart rate monitor you may be using) in the upper left corner.
- Tap START to begin your workout.
![]()
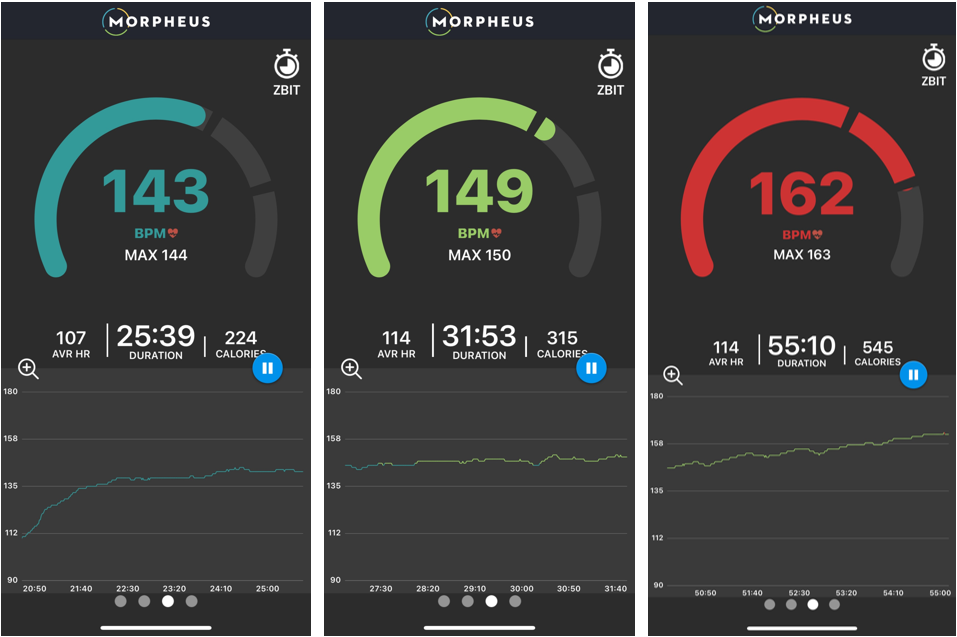
Live Data View During a Workout
- Your heart rate will appear in the center of the dial in the color of the zone you are in.
- The heart rate zones dial is split into 3 sections. Each of these 3 sections represents one of your Morpheus HR Zones on that day.
- As your heart rate increases, you will see the dial fill up with color to help you see exactly where you are within each zone.
- The bottom of the screen has 4 different views that you can swipe left or right to get to.
- If you want to use the Zone-Based Interval Training (aka ZBIT) feature, tap on the stopwatch in the upper right hand corner of the train screen. You can do this either before or after you officially start your workout.

Ending Your Workout
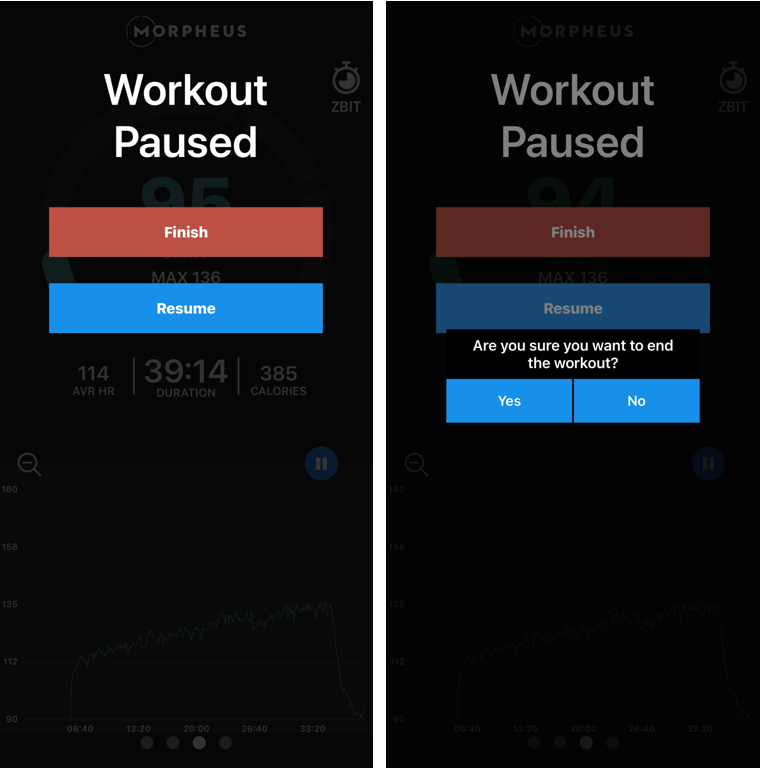
- When ready to end your workout, tap the blue circular pause button
 and then tap Finish.
 - Tap Yes to confirm that you want to end the workout.
- A post-workout questionnaire will appear.
- Answer the questions by moving the slider scale anywhere from 0 to 10.
- When rating workout difficulty (RPE), 10 is the most challenging/fatiguing and 0 is the least challenging/fatiguing.
- Try to estimate your RPE as accurately as possible because it impacts your post-workout recovery score adjustment (explained below).
- When rating your performance, 0 is your worst performance; 10 is your best performance. This is entirely subjective and does not impact any of your data.
- In the notes box you can type anything that you want that may help you remember what you did during the workout or how you felt or anything else that you find valuable.
- Please note that you can enter or edit notes after submitting a workout via the workout results screen.
- When rating workout difficulty (RPE), 10 is the most challenging/fatiguing and 0 is the least challenging/fatiguing.

- Tap Submit at the bottom of the screen once you’ve completed the questionnaire.
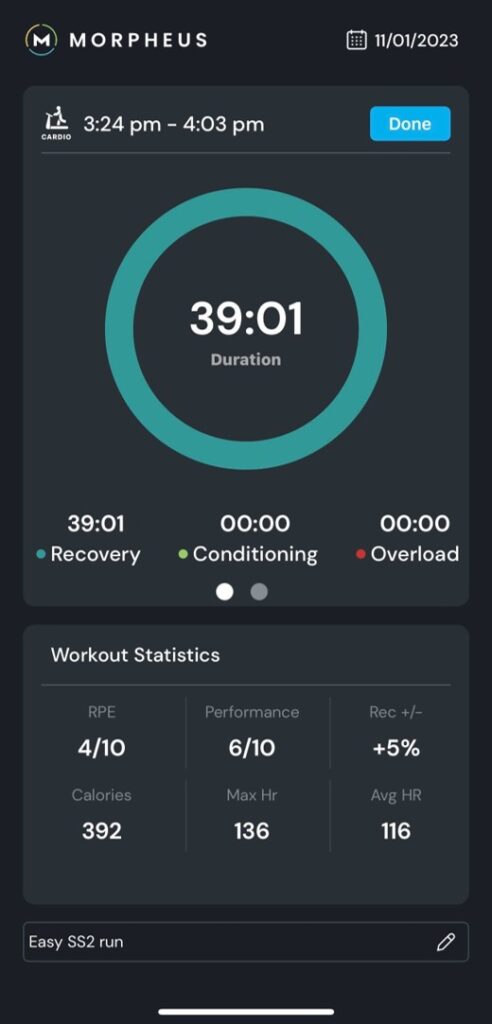
Viewing Workout Results
- You'll be redirected to the workout results screen. On this screen you'll see the following metrics:
- The workout type and time stamp
- The total duration of your workout
- The time in each heart rate zone (for cardio and mixed workouts only)
- Your RPE and Performance ratings from the post-workout questionnaire.
- Your workout notes. You can tap in the notes box and make and additions or edits.
- Recovery score adjustment. For more information on what this means, please see this article.
- Calories burned, Max HR, and Avg HR
- This workout will be saved in the app and you can view the results again at any point in time by going to workout history (explained at the bottom of this article)
After each workout, it's recommended to then unsnap the sensor from the chest strap until the next workout to maximize battery life.
Please note: DO NOT sync your M7 and then import the exact same workout that you just completed live with the app. The sync and import process is for workouts during which you did not use the TRAIN function of the app in real time. See below for details about this full sync and import process.
With the M7 but WITHOUT the Morpheus app (Offline mode)
If the type of training you're doing makes it difficult or impractical to use the Morpheus app, you can use the M7's onboard memory to train and record your workout to sync to Morpheus after it's done.
You can choose to use the M7 by itself, or you can also connect it any heart rate watch or device that is compatible with Bluetooth or ANT+. If you connect it to Garmin device, you'll also have the option to import the workout directly from Garmin Connect.
Starting a Workout
- The M7 starts recording the moment that you put it on and it starts detecting your heart rate.
- Note: If you are wearing the M7 for some time before you actually start your workout, you will have the opportunity to adjust off any "junk time" during the sync process (explained below)
Live Data View During a Workout
- You can use the M7 by itself in which case there will be no live heart rate data to view.
OR
- You can pair the M7 to any watch or any device that allows for ANT+ or Bluetooth heart rate from an external heart rate monitor.
- This means you can pair it to devices such (but not limited to) the following:
- Garmin watch, Apple Watch, most Polar watches
- Garmin and Wahoo bike computers
- Some cardio equipment such as C2 BikeErg and RowErg, Technogym, etc
- To determine if the M7 can pair to your specific device, check the instruction manual for your device and look for ANT+ or Bluetooth heart rate monitor pairing.
- This means you can pair it to devices such (but not limited to) the following:
Stopping a Workout
- Remove the transmitter from the strap
- After about 5-10 seconds, it will power off due to lack of heart rate signal. This officially ends your workout.
Important Notes:
- Each workout must be at least 10 minutes long to be recorded to the M7 internal memory.
- If you plan to do back to back separate workouts, to start recording a new workout, you must wait at least 5 minutes after ending your previous workout.
- This means you must disconnect the M7 from the strap for at least 5 minutes. Then reattach it and it will begin recording a new workout.
Syncing and Importing Workout(s)
IMPORTANT: To sync a saved workout from the M7 to the Morpheus app, you must first be wearing your M7 so that it is powered on.
- Open the Morpheus app and tap on Menu in the bottom right corner.
- Tap SYNC
- If you have your Morpheus app paired with Garmin Connect, you will see the choices of Morpheus HRM and Garmin Connect.
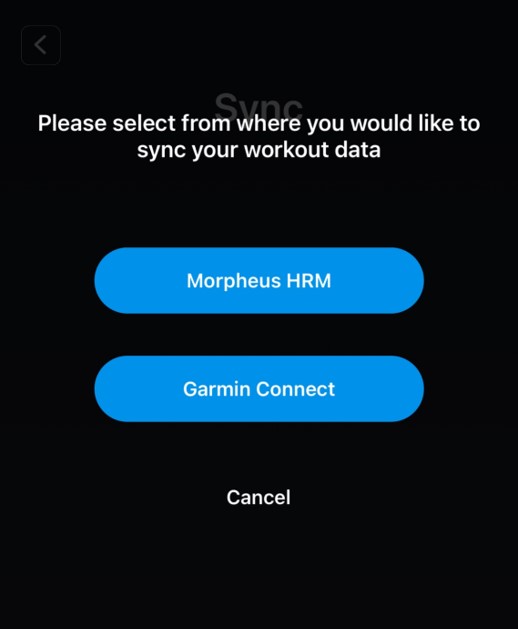
- Tap Morpheus HRM
- If you do not have your Morpheus app paired with Garmin Connect, you will not see the screen pictured above. Instead you will be redirected immediately to the device selection screen.
- Select your M7 by tapping the box to the left of it
- Tap OK at the bottom to continue.
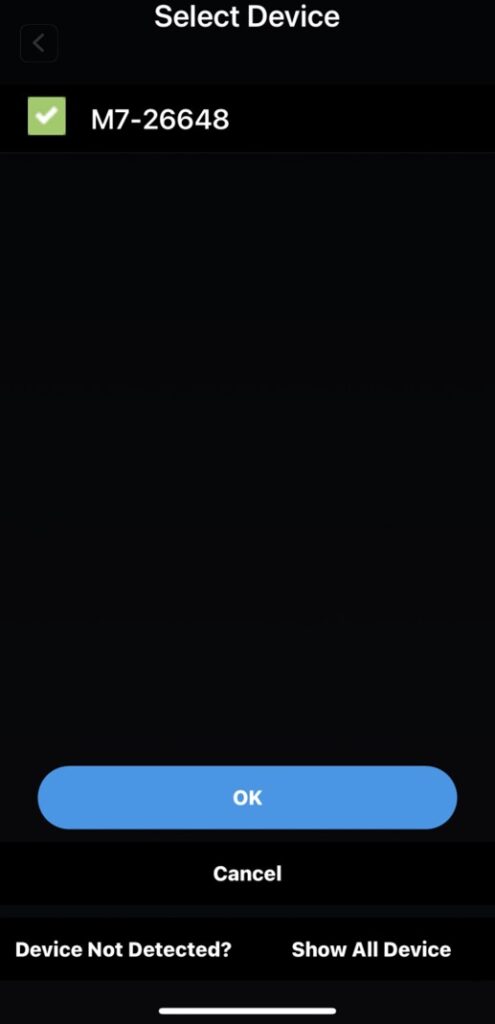
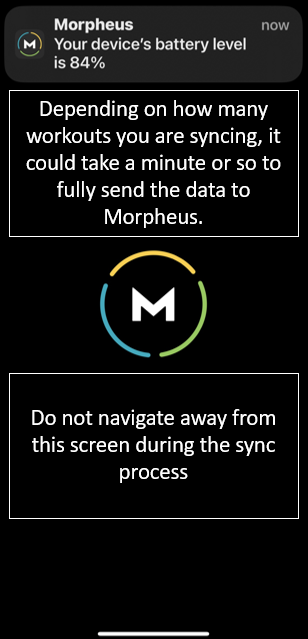
- This will trigger the syncing process during which the M7 is sending workout data to your phone.
- A list of all workouts that are stored on your M7's internal memory will appear.
- Select ALL of the workouts that you need to import into Morpheus.
- Only choose workouts that were NOT recorded in real time with the Morpheus app.
- IMPORTANT: Any workout that you do not select will automatically be deleted from the list.
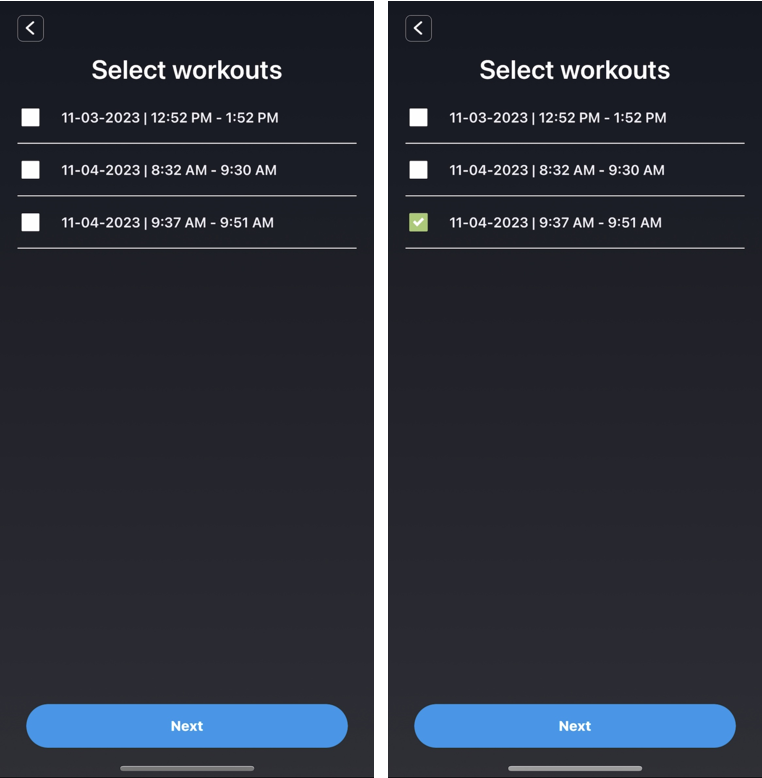
- Press NEXT when ready
Since the M7 records all workouts, there may be workouts in the list that you completed while connected to the Morpheus app in real time. No need to select and import those because they have already been fully recorded and saved.
NOTE: If you do select and import any workout that has already been recorded live in the app, the data of synced workout will override the data of the live workout and there will not be a duplicate workout.
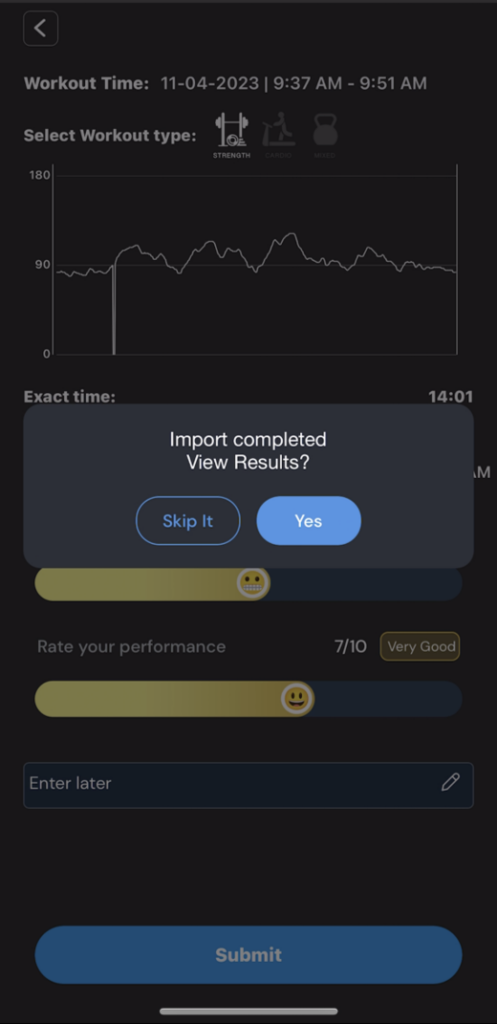
- You will see the workout details appear on the screen.
- Select a workout type (cardio, mixed, or strength) by tapping the appropriate icon at the top of the screen.
- When choosing cardio or mixed, you will see a colored graph depicting when you were in each heart rate zone.
- When choosing strength, you will see a gray/white graph because there are no heart rate zones.
- If you need to trim any "junk time" off of the beginning or end of your workout, you can do so by sliding the "exact time" slider bar.
- This slider can help you keep only the data that was a part of your actual workout.
- Set your RPE and rate your performance with the slider bars
- Enter notes if you want to
- Note that you can also do this after a workout has been submitted.
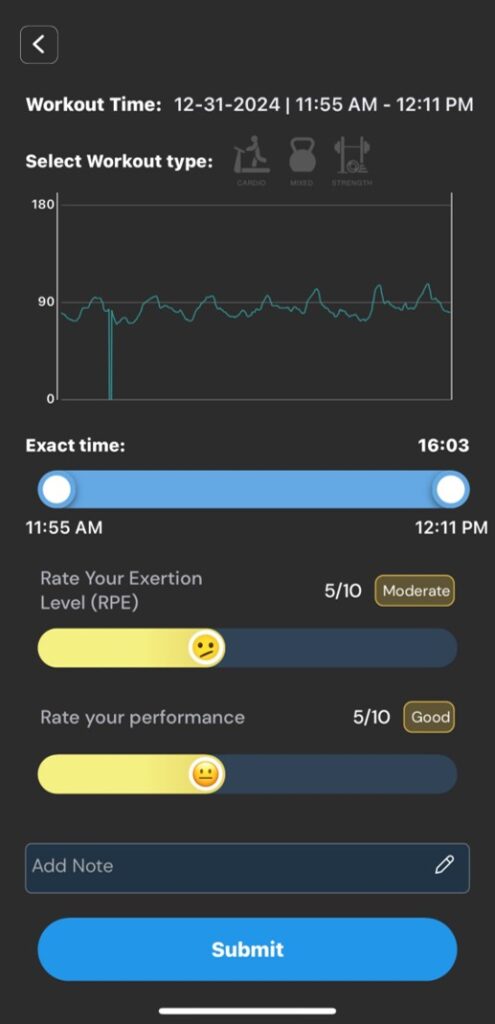
- If you have only selected 1 workout to import, you will see a SUBMIT button at the bottom
- If you have selected more than 1 workout to import, there will be a NEXT button at the bottom. This will allow you to set the details of each of the workouts that you selected.
- When you are finished, tap SUBMIT to complete the process.
- Once the import process is complete, you can choose to view the workout results by tapping YES. Or you can choose SKIP IT and you'll be redirected to the home screen of the app.
Import Workouts from Garmin Connect
Overview
- This feature allows you to use your Garmin watch or other Garmin device to record workouts and Morpheus can import that workout data directly from your Garmin Connect account.
- This will help in situations where using the Morpheus app in real time or using the Morpheus M7 are not practical or not preferred.
- It is still a good idea to pair your M7 or other HRM to your Garmin watch or other Garmin device. This will ensure that you have the most accurate heart rate data during your workout.
- To pair the M7 to your Garmin watch using ANT+ or Bluetooth, please see the instructions provided by the manufacturer of the compatible device you are trying to connect to.
- For detailed info about how this Garmin workout sync process works (beyond what is shared below), please visit this link.
Syncing and Importing Workout(s)
- Open the Morpheus app and tap on Menu in the bottom right corner.
- Tap SYNC
- If you have your Morpheus app paired with Garmin Connect, you will see the choices of Morpheus HRM and Garmin Connect.
- Tap Garmin Connect
- A list of all workouts that are have been sent to Morpheus from Garmin will appear.
- Select ALL of the workouts that you need to import into Morpheus.
- Press NEXT when ready
IMPORTANT: Any workout that you do not select will automatically be deleted from the list.
- Complete all of the same steps as are listed above in the section about syncing and importing workouts from the M7
Extras
- There is a Garmin Connect IQ data field app that was created by a private developer which will allow you to see Morpheus heart rate zones on your Garmin watch (see details and compatible devices at the link below).
Garmin Connect IQ Morpheus Zones
Viewing Workout History
- Any workout that you complete with any of the 3 processes explained above can be viewed in your app at any time afterward.
- To access your workout history, tap on the down arrow just below the weekly training zone targets section of the home screen.
- Tap on the HISTORY tab.
- Then tap on any workout you want to view in more detail. You can swipe the list upward or downward to see more workouts in your history.
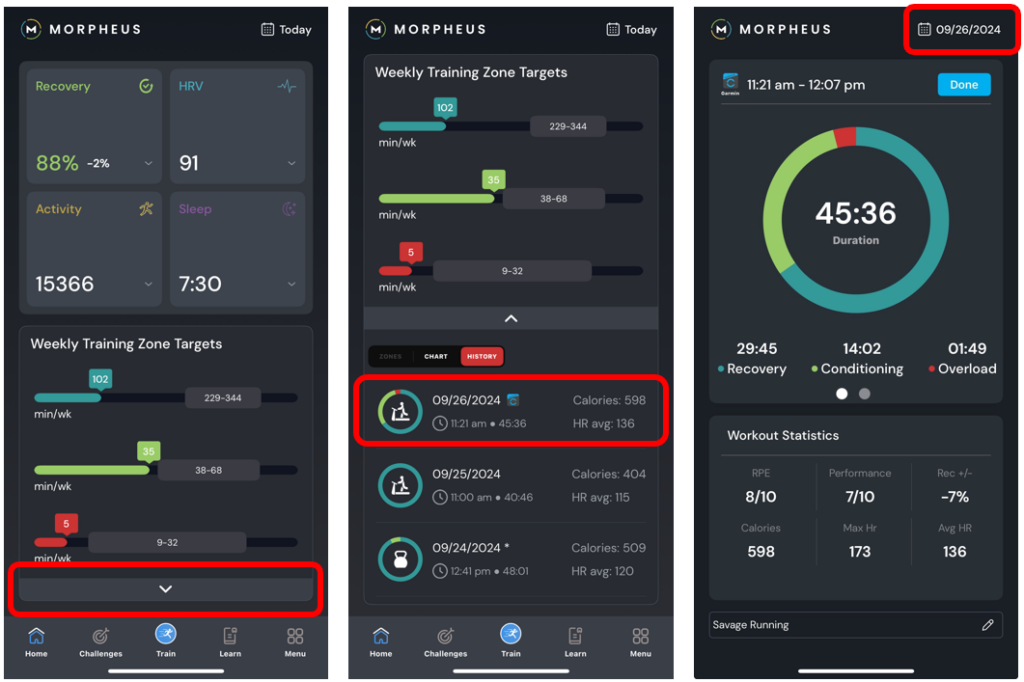
- Once you are on any workout results screen, you can tap the date/calendar icon in the upper right corner to open a larger workout history list.
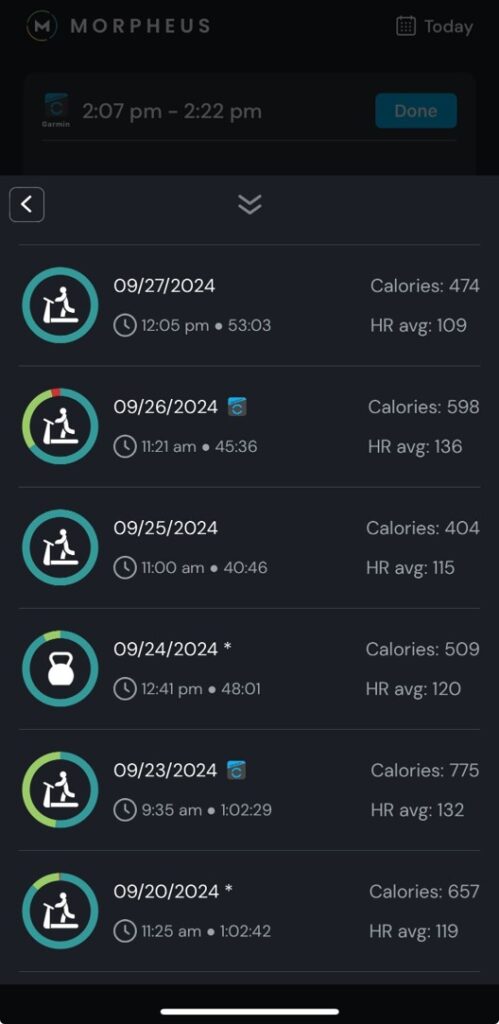
- When you look at your workout history in the app either on the home screen or by tapping the calendar icon at the top right of any workout results screen, you will notice a few things:
- All workouts that you completed LIVE with the app do not have an asterisk
- All workouts IMPORTED from the M7 have an asterisk * next to the date.
- All workouts IMPORTED from Garmin Connect have a Garmin symbol next to the date.

- If you ever need to delete a workout, you can do so by going to workout history and the left swipe on the workout you want to delete and then choose Yes to confirm it.
- Please note that if you delete a workout, it is permanent.

FAQ & Troubleshooting
For more information regarding how to get the most out of your M7, please see our FAQ & Troubleshooting lesson a bit later in this 101 course.
Direct link here.
If you need additional help with your M7, please don't hesitate to contact us by sending us a support ticket from the Morpheus app, or by clicking here to submit a support ticket.
We answer all support tickets and email within 24 hours Monday - Friday and are happy to help make sure you're getting the most out of your M7.