No matter what your goal may be, focusing on recovery is an important part of making sure you reach it. That’s because it’s only when your body is recovering that it’s improving.
To get started unlocking the power of recovery, follow the guidelines below.
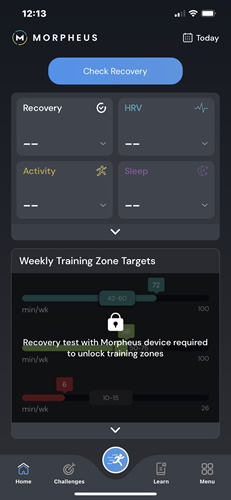
Note: a recovery test with HRV is required to fully unlock the app’s features.
HRV Best Practices
Because HRV is a sensitive measurement, it’s important to follow a few testing guidelines no matter which device you’re using. This will make sure you get the most accurate results possible.
- Try to take your measurement in the morning each day if possible. Usually within 10-30 minutes of first waking up is best.
- Avoid stimulants or anything that can increase your heart rate immediately before the measurement.
- Try to stay relaxed throughout the test. Avoid talking, eating, or moving until the test is complete.
- Breathe naturally. Do not try to follow a specific breathing pattern or hold your breath during the test.
- Try to take your measurement in a place that’s quiet and free from distractions as much as possible.
- Make sure to take your measurement in the same position, laying down or seated, each time. If your resting HR is above 50bpm, laying down is recommended. If it’s below 50, seated is preferred.
Checking your recovery
Open the Morpheus app and select “CHECK RECOVERY” from the middle of the app home screen.
Once you’ve done that, you will taken to the recovery questionnaire page to enter your hours of sleep, sleep quality, soreness, and your overall well-being.
You can also add any notes that you’d like to track as well.
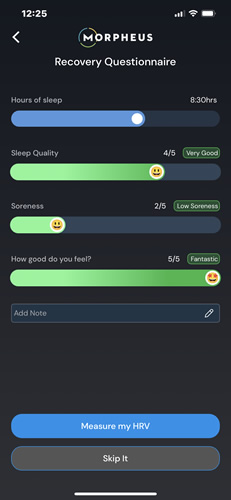
Once you’ve filled the questionnaire out, you can choose to measure your HRV or “Skip it.”
Note that to fully unlock Morpheus, you will need at least one HRV measurement.
Although daily HRV measurements are not required, it’s recommended to include one in your daily routine as consistently as possible for the highest level of accuracy.
Measuring HRV
Because your first recovery test is used to set your weekly target zones, it’s highly recommended that your first test be done in the morning, to ensure the highest accuracy possible.
See “HRV Best Practices” at the bottom of this lesson.
To measure your HRV with the M7, you’ll first need to make sure the transmitter is snapped into the chest strap and the strap is securely around your chest as positioned below.
Best steps for putting on the M7:
- Put the strap on your chest first. To get the most accurate heart rate reading, the M7 needs to have good skin contact. It’s important to make sure the strap is tightened to fit snugly. If the strap is too loose, it may move around when you’re training and lose skin contact which will cause it to lose heart rate signal and disconnect from the app.
- Next, put a fair amount water and/or electrode gel on the skin side of the strap on the rubber sections to the left and right of the middle. If you do this after you are already wearing the strap then it will be less likely to rub off and will also get on your skin where the strap touches. Electrode gel will provide the best contact possible, but water works well for most people. When you do this after you are already wearing the strap it prevents the water or gel from rubbing off as you put on the strap.
- Finally, fully attach the transmitter to the strap by snapping it onto both ports. You will hear a single audible beep and the LED light will turn on and blink when it’s been activated. It will blink a few times in a white color while searching for HR and then it will blink blue for 10 seconds after it has found solid HR signal. After that the LED will shut off, but the device remains powered on and active. If it does not beep and start flashing almost immediately when you attach it to the strap, you likely need to either make some adjustment to the strap (tightness or positioning) or need to put more water or electrode gel on it.
Below represents how the M7 should be positioned for men (left) and women (right). Note that it is also acceptable for women to slide the M7 strap and transmitter under the bottom of a bra.
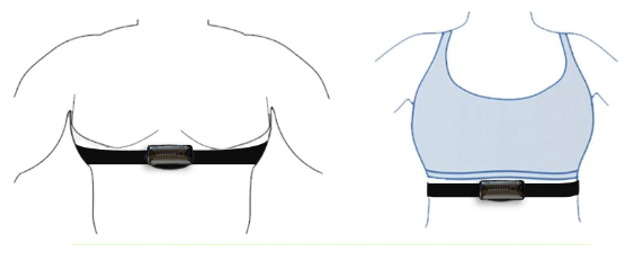
Note: Some people may benefit from shifting the transmitter slightly to the left instead of having it centered. This may place the electrode area of the strap closer to the heart.
If you have the strap and transmitter placed correctly and are having an issue getting it to read your heart rate, it often helps to get the chest strap slightly wet to improve conductivity.
**If you’d prefer to do your HRV test with an armband device and dedicate your M7 to training, the Scosche Rhythm 24 is the only device other than Morpheus devices that is compatible (and accurate) for the test in the Morpheus app. It is available on the Scosche website and on Amazon. If you are not located in the US, you can purchase on Amazon by using the .com ending to the URL.
If you want an extra strap or a replacement strap you can purchase directly at one of the links below. Some people choose to have one dedicated to the morning HRV test and they leave it at home. And the other is used for training. Other people just rotate through a couple of straps randomly. An extra strap certainly is not required but is an option.
Size XS-S Strap for M7:
https://eza.infusionsoft.com/app/orderForms/m7-replacement-strap-small
Wearable size (XS-S): 20″ to 28″ (51 to 71 cm) with max stretch to fit 38″ (97cm)
Size M-XXL (standard size) Strap for M7:
https://eza.infusionsoft.com/app/orderForms/M7-strap-regular
Wearable size (M-XXL): 24” to 36” (61 to 92 cm) with max stretch to fit 60″ (153cm)
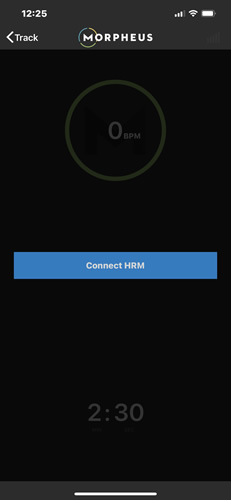
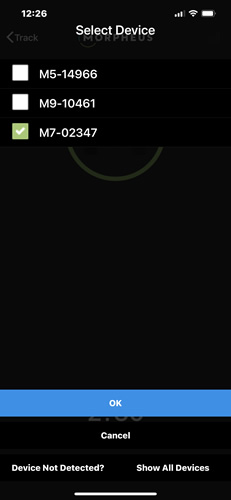
Once you select “Measure my HRV” from the recovery questionnaire, you then connect the M7 to the app by hitting “Connect HRM” and then selecting it from the list of devices.
If it doesn’t appear, give it a few seconds for the app to detect it.
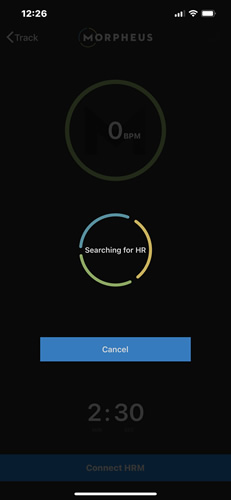
Once the app has found and connected to the M7, it will display, “searching for HR” while it looks for heart rate from the M7 sensor. As soon as your heart rate is detected, it will be displayed and the “START” button will turn appear on the screen.
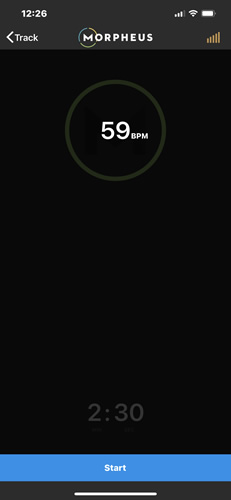
It’s recommended to wait until your heart rate is stable before pressing “START” to begin the test. Once you’ve pressed “START” Morpheus will also to make sure the reading is stable and then automatically begin the 2:30 HRV test.
The stabilization detection is to ensure the HRV test is as accurate as possible. For more guidelines on accuracy, refer to the “Best Practices” at the bottom of this lesson.
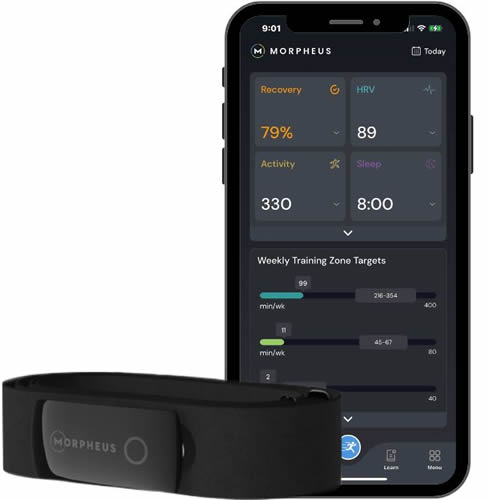
As soon as the HRV test is complete, you will be redirected to the home screen, where your recovery score and HRV will be displayed.
With the recovery check complete, your heart rate zones will also be set for the day as well.
Note that it generally takes 5-7 days to establish your HRV baseline. Because of this, your recovery score will be less accurate the first few days that you begin using Morpheus.
It’s recommended to give it about 1 week of using Morpheus before you start relying on the recovery score to drive your training and fitness.
Skipping the HRV test
While it’s recommended to measure your HRV as consistently as possible, it is not required for Morpheus to calculate a recovery score. Based on millions of data points, Morpheus is now able to predict your HRV and give you a recovery even without an HRV test.
When you hit choose to skip the HRV test, you will immediately be redirected to the home screen.

Note that at least one HRV measurement is required to unlock all the Morpheus features and the more frequently you measure HRV, the more accurate your training zones and weekly zone targets will be.
FAQ & Troubleshooting
Q: Can I take my recovery test more than once per day?
No, Morpheus is designed for one HRV measurement per day. This is because Morpheus works by comparing your HRV each day to your baseline. Measuring HRV multiple times per day decreases accuracy and makes it more difficult to track trends and changes.
To understand more about how Morpheus calculates the recovery score, click here.
For more information regarding how to get the most out of your M7, please see our FAQ & Troubleshooting lesson a bit later in this 101 course.
Direct link here.
If you need additional help with your M7, please don’t hesitate to contact us by sending us a support ticket from the Morpheus app, or by clicking here to submit a support ticket.
We answer all support tickets and email within 24 hours Monday – Friday and are happy to help make sure you’re getting the most out of your M7.