Once you’ve installed the Morpheus app and created your account, the last step before you can use Morpheus to measure your recovery or workout is to setup the Morpheus M5 and M7.
Don’t worry, this is a quick and easy process that requires just a few steps to complete.
M5 Setup
To get your new M5 up and running, follow the steps outlined below. This will ensure your M5 is ready to be used for measuring recovery and training.
If you run into any problems, you can review the complete M5 user guide or click here to visit our support portal.
Step 1: Unlock and charge the M5
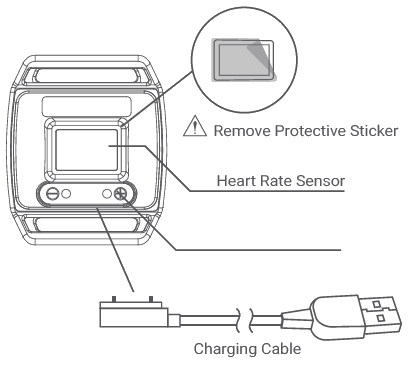
To unlock the band and disable shipping mode, first remove the plastic from the sensor and connect the charging cable to the terminals on the back. It is recommended to charge the M5 battery to full prior to first use.
The battery indicator and charging notification will display in center of the M5 screen when connected to the charging cable and in the upper right-hand corner of the screen when disconnected from the charging cable.
Step 2: Sync to Set the time
The final step is to connect to the M5 to the Morpheus app to set the correct time.
Important note: Make sure that you DO NOT connect the M5 directly to your phone in the Bluetooth device settings as you may do with other Bluetooth devices. The connection must take place through the app or the M5 will not show up in Morpheus as an available device.
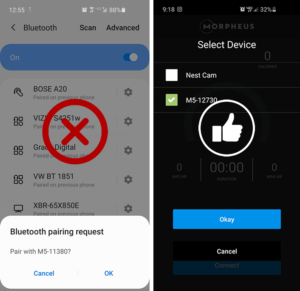
To set the time, press the power / select button on the right side of the M5 band. The OLED screen will power up and display “SYNC TO SET TIME”
To do this, click “SYNC” and then press “connect” to bring up the device list to select the M5.
If you do not see the M5 in the list of devices, you may have accidentally connected the M5 to your phone directly. You will need to open Bluetooth settings and hit “forget this device” in order to use the M5.
Once you’ve connected to the M5 and hit the “SYNC” button, you’ll see the screen change to update to the current time.

This indicates your M5 is setup and ready to use!
Updating the firmware
In the event that your M5 needs a firmware update, you will see a notification in the app. This process is important to complete and only takes 1-2 minutes.
Simply follow the on-screen instructions to update the firmware and make sure you do not close the app in the middle of the update.

Note that once the update is complete, you will need to SYNC the M5 again to re-set the time before it can be used.
M7 setup
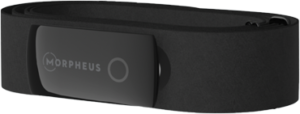
Setting up your M7 heart rate monitor quick is the same process as the M5. All you have to do is make sure it’s fully charged and then set the time to complete the setup.
You can also find the complete M7 user guide by clicking here
Step 1: Charge the M7
The M7 may come with a charge, but it’s best to make sure it’s fully charged before first use. The circle LED light will turn solid green when charging is complete.
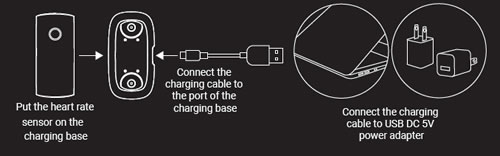
Note: please use a standard power adapter to charge the M7. The use of non-standard chargers may damage the M7.
Once the M7 is fully charged, the final step is to connect it to the Morpheus app and set the time.
Step 2: Sync to set the time
In order to set the time, you will need to connect the M7 to the Morpheus app using the same process as for the M5.
Important:You will need to turn the M7 on before you can connect it to the Morpheus app. To do this, put the chest strap on as indicated below. You will hear an audible beep and the LED light will turn on when it’s been activated.

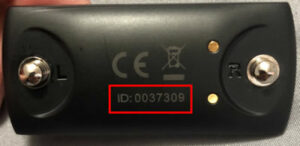
Your M7 has a unique ID to help identify it if there are other M7s in close proximity. You can find your ID on the back of the sensor.
Once you have connected the M7 to the app, it will set the current time and display a message that the process is complete.
This means your M7 is now ready to use.
How to get help
If you run into any trouble along the way and/or need any additional help setting the Morpheus devices, we’re here to help! The best way to get help is to click here to visit our support portal.
Here, you’ll find answers to common questions, troubleshooting tips, and you can submit a ticket directly to our support team.