Morpheus M7 User Guide
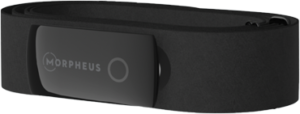
The M7 features the most accurate ECG and sensor in the industry packed into a slim and lightweight design.
It includes 10 hours of built-in memory and up to 200 hours of battery life on a single charge. The M7 is designed to work with the Morpheus Training system, but it can also be used with:
-
ALL Bluetooth devices and apps
-
ANT+ devices made by Garmin, Suunto, Samsung and more
-
Cardio equipment that accepts ANT+ or Bluetooth heart rate transmission (such as Octane, Woodway, Technogym, and more)
Follow the steps below to start using the M7 to get the most out of your training. You can also contact support with any questions not covered in the guide by clicking here to send an email to us.
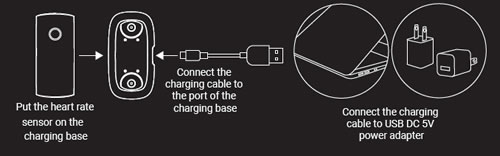
Step 1: Charge the M7
The M7 may come with a charge, but it’s best to make sure it’s fully charged before first use. Note that it may arrive to you with already close to full battery life. The circle LED light will turn solid green when charging is complete.
IMPORTANT:
– Use ONLY the USB cable that comes in the box or one like it.
If you received your M7 before March 1, 2026 you should use a USB-A to USB-C cable.
If you received your M7 after March 1, 2026 you can use USB-A to USB-C or a low power USB-C to USB-C cable.
– Make sure to use a standard USB 5V power adapter to charge the M7.
– The use of non-standard, higher power chargers or cables, like those that are designed for charging phones and tablets, may damage the M7.
Do not charge the M7 with high power USB (aka “quick charge”) adapters or high power wall outlets (such as 240V outlets).
Charge it via a laptop or computer (which will likely supply 5V of electricity) or other low power USB power source such as a 5V power adapter.
Do not overcharge your M7 as that can cause damage to the battery.
Do not charge the M7 overnight.
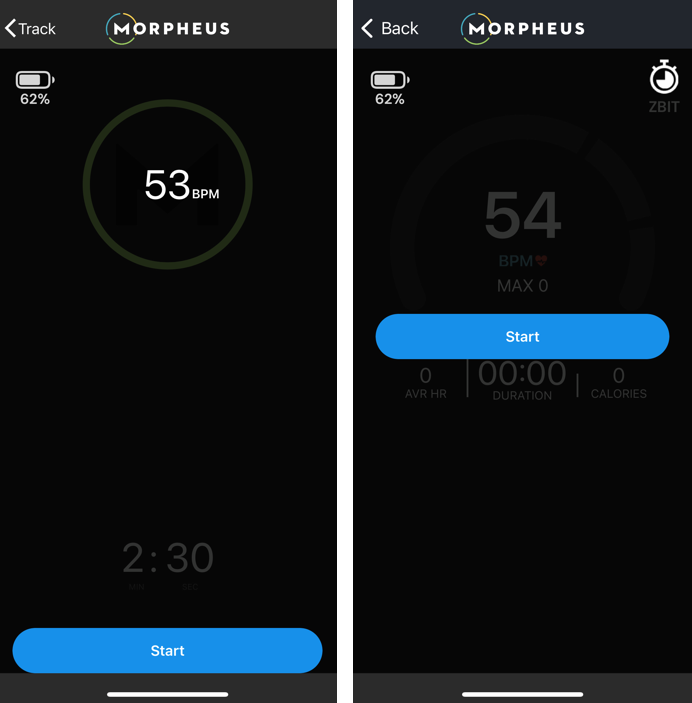
When you connect the M7 to the app for the recovery test or for training, you will see its remaining battery life in the upper left corner of the app. There is no need to charge the device when you’re above 50% battery life.
Once the M7 is fully charged, the final step is to connect it to the Morpheus app and set the time on the device.
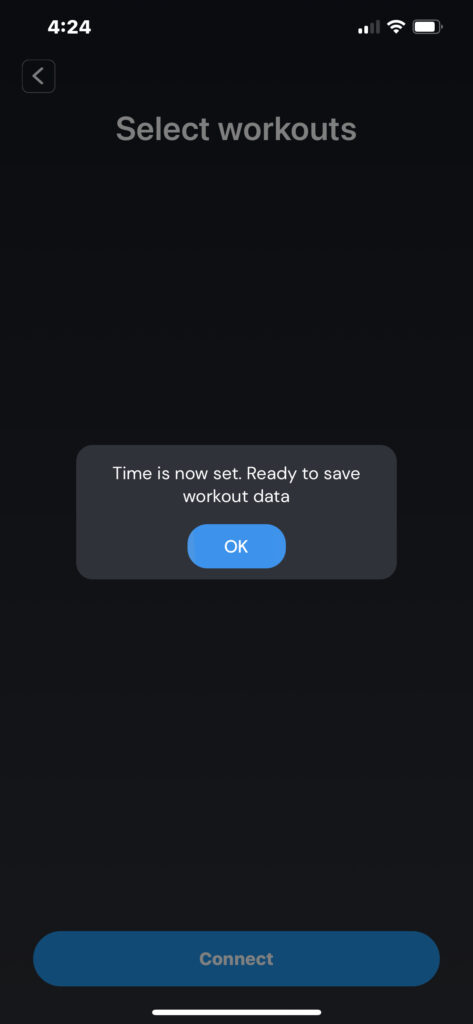
Step 2: Sync to set the time
The correct time needs to be set on the M7 in order to activate the memory function so that your workouts will be recorded.
The time only needs to be set during the initial setup, or if the battery is completely drained and then recharged.
Until you do this, it will not save workout data.
DO NOT connect the M7 directly to your phone through Bluetooth settings.
1. You need to be correctly wearing the M7 to activate the heart rate sensor.
For important info and tips regarding wearing and using the M7 heart rate monitor, please visit the link below.
2. Open the Morpheus training app.
3. Press MENU and then SYNC in the Morpheus to connect to the M7 and set its internal clock.
4. Press the blue CONNECT HRM button at the bottom. You will see a list of any nearby Bluetooth devices. Choose your M7. The number in the app will match the number on the back of your M7 transmitter. Check the box next to your M7 and then press OK.

How to Wear the M7
Making sure that you're wearing the M7 correctly is the most important step to getting consistent and accurate data. There are three simple keys to wearing the M7 properly: placement, sensor orientation, and skin contact.
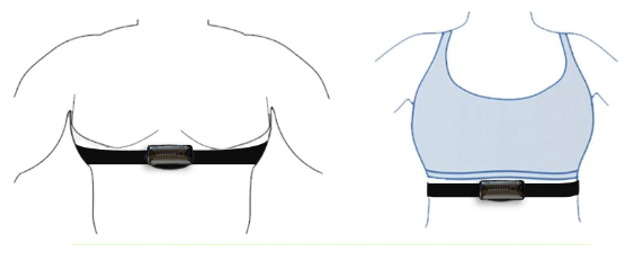
Proper placement:
The M7 should be placed directly underneath the pectoral muscles with the sensor over the bottom of the sternum as seen below.
We recommend to put the chest strap on by itself first, then put water or electrode gel on it, and then finally snap the sensor into place before each workout.
Below represents how the M7 should be positioned for men (left) and women (right). Note that it is also acceptable for women to slide the M7 strap and transmitter under the bottom of a bra.
It's also possible to place the sensor on your back to the left of your spine. Just flip the transmitter upside down and it should work just as well as if on your front side.
Important: You will need to turn the M7 on before you can connect it to the Morpheus app. To do this, put the chest strap on as indicated below.
Best steps for putting on the M7:
- To get the most accurate heart rate reading, the M7 needs to have good skin contact. Put the chest strap on your body correctly and tight enough so it doesn't slide down. It is adjustable to get it just right for you. Do this WITHOUT the transmitter snapped onto it.
- Put a fair amount water and/or electrode gel on the skin side of the strap on the rubber sections to the left and right of the middle. Just use a water source of some kind (not filtered water because that has all the conductive components removed) and get your fingers wet and rub them under the strap. Do this a few times. If you do this after you are already wearing the strap then it will be less likely to rub off and will also get on your skin where the strap touches. Electrode gel is also an option, but water works well for most people.

- Finally, fully attach the transmitter to the strap by snapping it onto both ports. Ensure that it is attached right side up and not upside down (see below regarding sensor orientation).
- The circular LED light on the transmitter will turn on and blink white when it's been activated. It will blink a few times in this white color while searching for HR and then it will blink blue for 10 seconds after it has found solid HR signal. After that the LED will shut off, but the device remains powered on and active.
Sensor Orientation:
Important: In order to read accurately, the heart rate sensor must be snapped into the chest strap so that the Morpheus logo is right side up and could be read by someone facing you. This means when you snap the sensor into the chest strap, the Left snap should be on the left side of your body and the Right snap should be on the right. The back side of the sensor also has L and R next to the pins.

The strap for your heart rate monitor will need to be replaced.
How often you should replace your strap depends on how frequently you use it.

These are general ranges. Some straps last longer with great care, while others may wear out sooner with heavy sweat or frequent washing.
You can read more about caring for your M7 transmitter and strap as well as how to know when it may be time to replace it at the links below:
Caring for Your M7: Daily Care & Cleaning Guide
Heart Rate Monitor Straps Wear Out - Here’s How to Tell
If you want an extra strap or a replacement strap you can purchase directly at one of the links below. Some people choose to have one dedicated to the morning HRV test and they leave it at home. And the other is used for training. Other people just rotate through a couple of straps randomly. An extra strap certainly is not required but is an option.
Size XS-S Strap for M7:
https://eza.infusionsoft.com/app/orderForms/m7-replacement-strap-small
Wearable size (XS-S): 20″ to 28″ (51 to 71 cm) with max stretch to fit 34″ (86cm)
Size M-XXL (standard size) Strap for M7:
https://eza.infusionsoft.com/app/orderForms/M7-strap-regular
Wearable size (M-XXL): 24” to 36” (61 to 92 cm) with max stretch to fit 60" (153cm)
Note: When you are not wearing the M7, always fully unsnap the sensor from the chest strap. Wipe sweat off the back of it to prevent the pins from becoming corroded. Store it in a location so that the pins on the back of the sensor are not in contact with anything conductive. It will turn on automatically when you snap it back in and put it on prior to a workout.
M7 LED Colors and Battery Life
Once the M7 is worn correctly, the LED will begin flashing white to indicate that it is searching for heart rate.
When it has found your heart rate, it will flash blue for 10 seconds. This lets you know the M7 is working correctly and recording your heart rate.

The battery life of the M7 is up to 200 hours of activity from full charge to completely drained. This means you do not need to charge it very often.
When you connect the M7 to the app for the recovery test or for training, you will see its remaining battery life in the upper left corner of the app. There is no need to charge the device when you’re above 20% battery life.
Using the M7
The M7 heart rate monitor provides the most accurate and seamless experience with Morpheus.
It is important to fully understand and utilize best practices when it comes to getting the most out of any heart rate monitor chest strap device like the M7. The link explains these best practices and other tips to get the most out of your M7:
For detailed info on how to use your M7 for the Morpheus Recovery Check, please visit the link below:
For detailed info on how to use your M7 for the workouts/training with Morpheus, please visit the link below:
FAQ & Troubleshooting
For more information regarding how to get the most out of your M7, please see our FAQ & Troubleshooting lesson in the 101 course which can be found by tapping on LEARN on the bottom of the home screen in the app.
Direct link here.
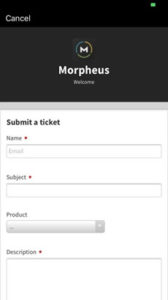
If you need additional help with your M7, please don't hesitate to contact us by sending us a support ticket from the Morpheus app, or by clicking here to send us an email.
We answer all support tickets and email within 24 hours Monday - Friday and are happy to help make sure you're getting the most out of your M7.
To connect with fellow Morpheus users and join the community, make sure to click here to join the Morpheus user group on Facebook. You can also follow Morpheus on Instagram and get daily tips on training, recovery, and more.